Navigating through the capabilities of PowerApps and Power Automate can open up new possibilities in streamlining digital workflows, even for the non-technical among us. Today, we're exploring a straightforward and useful application of these tools: capturing a signature image with PowerApps and then transmitting it via a Power Automate workflow.
Whether it's for verification, authorization, or simply record-keeping, transmitting graphical data like signatures through automated workflows can be crucial in numerous business processes. But how can this be done in a straightforward and user-friendly way? That’s where our exploration begins today.
In the coming paragraphs, we’re going to walk through the steps and considerations to:
Develop a Power Automate Workflow: Create and set variables, build steps, and forge paths that our data will travel along.
Design a Power App: Set up interfaces, define interactions, and establish how our app will communicate with our workflow.
We've detailed each process into simple, easy-to-follow steps, ensuring that you can not only follow along but also implement this knowledge directly into your own projects and workflows.
We aim to keep things light, straightforward, and above all, informative and applicable. Whether you're just starting out with PowerApps and Power Automate or looking to expand your existing knowledge, we hope this guide provides you with useful insights and practical knowledge.
Prerequisite Tasks
To perform the steps in this blog you first need to create a Power Automate workflow that is called by a Power App, as well as the Power App itself. The Power App needs to pass a Text parameter to the workflow when called. You can learn about how to setup both the Power App and the Power Automate workflow in our Seamless Power App to Power Automate Integration Guide.
Creating the Power Automate Workflow
After creating your workflow the first step in your workflow will look like what you see below.
1. Set the PowerApps (V2) variable name to graphicString and the content to Hello.

2. Add a Compose step and then add the following Expression. There are three segments in the Concat step.

The first segment contains:
'<img src='The second segment references the Text variable from the PowerApps (V2) step.
triggerBody()['text']The third segment contains:
' alt="My Image" />'The full input contains:
concat('<img src=',triggerBody()['text'],' alt="My Image" />')3. Insert a Send an Email (V2) step. Add the recipient and subject just as you would with any email. Add the Output from the Compose step in the body. The output is the image of the signature that we will generate in our Power App.

Creating the Power App
After creating a Power App as shown in the integration guide do the following:
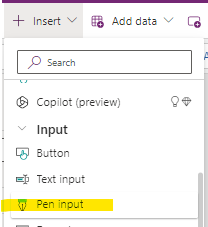
4. Insert a Pen Input.

5. Insert a Button.

6. In the OnSelect trigger for the button add the call to the Power Automate workflow you earlier created followed by a JSON function that will convert the Pen input image to a string. Make sure to include the JSONFormat.IncludeBinaryData format in your call.

7. Press the F5 key to preview the App. Create a signature and click the Button. The PowerApp will now call the workflow with the signature you created.
Conclusion
As we conclude our exploration into integrating PowerApps and Power Automate to handle signature images, it's invigorating to witness the harmonious blend of these two powerful platforms. Together, they not only demystify but also simplify a task that could otherwise seem technically daunting. Our foray into creating a tailored application and setting a workflow into motion – all with a practical, real-world example of handling signature images – is a testament to the approachable and scalable nature of these tools.
From the precise moment of capturing a signature via PowerApps, transforming it, and shuttling it smoothly through the Power Automate workflow, we’ve ventured through a process that echoes simplicity, yet is formidable in its practical applications. Navigating through this technological journey, you've walked through creating, customizing, and executing a workflow that effortlessly marries an interactive app with a robust, automated workflow.
Key Takeaways:
The Simplicity in Interaction: Through PowerApps, user interactions, such as signature inputs, become readily accessible and easily integrable into digital workflows.
Fluidity in Data Transition: The ease with which data transitions from PowerApps to Power Automate ensures that automation is not just a back-end process but a holistic, end-to-end journey.
Versatility in Applications: While our journey fixated on signature capture, the methodologies explored here sprawl into a myriad of potential applications across various business functionalities.
As you step back, armed with new knowledge and insights, it’s pivotal to ponder: How can these learnings be adapted and expanded within your own digital environment? The universality of PowerApps and Power Automate stands ready to simplify, automate, and enhance myriad aspects of your business processes.
Remember, this exploration doesn’t end here. It’s but a stepping stone into a world where your ideas, paired with the right technological tools, carve out innovative, efficient, and intelligent digital solutions.
We encourage you to experiment, explore, and extract the maximum from these platforms, and as you delve deeper into their capabilities, remember that every complex problem often has a simple, elegant solution waiting to be uncovered.
Thank you for joining us on this enlightening journey. Stay curious, keep exploring, and until next time, happy automating!
It works... but how does it work ?