The Data Warehouse in Microsoft Fabric is a great tool for organizations that want to analyze Microsoft Dynamics 365 Business Central data.
The Microsoft Synapse Data Warehouse is a 'traditional' warehouse and is currently a preview product included in the Microsoft Fabric preview. The data warehouse is a lake centric data warehouse that is fully scalable and easy to use. The warehouse supports the full transactional T-SQL capabilities and is tightly coupled with Power BI.
Let's go through an example for using the data warehouse. You are a purchasing team that is responsible for identifying and maintaining Dynamics 365 Business Central inventory reorder points. Individual team members have selected reorder-point formulas that are effective for the product lines they manage. There are many SKUs and locations. There is also a high volume of business that fluctuates significantly due to seasonality.
The team wants flexibility in their data content and wants to be agile in their algorithms as their portfolio of products is constantly changing. The team also wants to isolate the inventory usage calculations from their production Business Central system as to not compete or potentially conflict with other users of the system. In the past, the team's efforts have negatively impacted the sales teams Business Central's response times during order entry.
A data warehouse provides the team with a scalable solution to meet their needs and take the data offline from Dynamics Business Central. Data from Business Central can be filtered, modified, and combined simply and easily within Microsoft's Dataflow Gen2. Dataflow Gen2 lets users ingest, transform, and load data into the data warehouse and is a direct replacement for other extract, transform, and load (ETL) tools.
Let's go ahead and connect Business Central to a new data warehouse. We will load select Items data from Business Central as the Items table will be the foundation for our purchasing team's solution.
The first thing you need is Microsoft Fabric. Get Microsoft Fabric if you have not done so already.
1. Enter https://app.powerbi.com/ on your web browser.
2. Click on Workspaces in the left pane.
3. We will now create a new workspace where we will create the warehouse. Click on + New workspace at the bottom of the pop-up and then enter a name. I named my workspace Bluedialog. Click on the Apply button.
4. Click on the + New button, click on Show all at the bottom, and select Warehouse (Preview). Enter Warehouse_1 and click on the Create button. This may take a few minutes. This process also creates an associated dataset.

5. Click on Get data in the menu and click on New Dataflow Gen2.

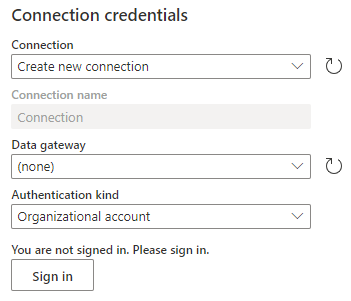
6. Go ahead and click on Get data in the menu. Enter business central as the data source. Click on the Dynamics 365 Business Central button. Click on the Sign in button and enter your credentials. Your Business Central instance should now show in the Session Credentials Connection box. Then click the Next button in the lower right side.

7. Drill down into the company of your choice until you get the the Standard APIs V2.0. then select the Items table. Click the Create button in the lower right of the screen.
8. You now have arrived at a Power Query form. This form should look familiar for those of you that have used the Power BI Power Query previously. We now want to select two columns for output to the warehouse. Click on Choose columns in the menu and only select the number and displayName columns. Click the OK button.

9. We will now go through a series of screens and ultimately arrive back at the Power Query form:
a. You will now select your Data destination as shown in the lower right corner. Select the Warehouse option and then on the Data destination form click the Next button in the lower right.
b. On the Connect to Data Destination form click on the Next button in the lower right.
c. On the Choose destination target form drill down until your reach Warehouse_1. Click on Next in the lower right corner.
d. On the Choose destination settings form click on Save settings in the lower right of the screen.
10. Back at the Power Query form you should now click on the Publish button in the lower right of the screen. Dataflow 1 was created and will run for a few minutes while getting the Item data into the warehouse.
11. We will now connect the new warehouse with Power BI. Click on Get data in the lower menu of your Power BI desktop application. Then, click on Microsoft Fabric (Preview) and then on Warehouses (Preview). Click the Connect button. Then click on Warehouse_1 and then the Connect button once again.

12. You will now see the Items table in the Data pane on the right side of the Power BI screen. We are done.

You can make changes to the dataset by editing the Dataflow 1 Dataflow. You can also set the times and frequency of refresh for the data through the Dataflow.
Comments